In order to make your app public and available for customers to install, you will need to submit it for a review from the Intercom team.
In this guide you will learn:
- Which apps require a review
- The difference between listed and unlisted apps
- How to submit your public app for review
- Submission requirements and common pitfalls
- How to submit updates to your app
If you are building an app that can be installed and used by any customer on Intercom, and will have access to their workspace data, you are building a public app. This means that the Intercom team must review and approve your app before it is available to install.
Private apps that only access your own paid workspace data do not require a review. You can ignore the rest of this page!
Your public app has the option of being listed or unlisted.
A listed app will be available for anyone to discover and install in the Intercom App Store.
This requires filling out the App Listing and App Partner Program pages in the Developer Hub and ensuring that all the requirements for each are met. Read more in the listing your app guide.
For listed apps, you can give your customers the option to install your app from the App Store or on your own website or app. You can set this in the Installation status section.
You must fill out the Installation status section in order to submit your app to be listed in the App Store. Providing broken or unclear links will result in an application rejection, and you will have to resubmit for review.
Choose "Directly from the Intercom App Store" and provide the Direct installation url, which should be the link that will kick off the OAuth flow right from the App Store.

Choose "Through your own product or website" and provide a Learn more URL, which should give clear instructions on how to install your app and provide a method for installation.

An unlisted app is a public app that is available for anyone to install but is not listed in the App Store: It must be installed via your own product or website.
Please provide clear instructions to your customers on how they can install your app.
Unlisted apps do not need to fill out the Installation status section. Please provide clear instructions in your own product on how customers can install and use your app.
Both unlisted and listed apps must be submitted for review.
Once you've finished developing your public app and have successfully set up OAuth, you can submit your app for review and choose when to make it available for install by filling out the pages in the Test and publish section of your Developer Hub.
The following sections detail important aspects of these forms that you will want to pay warning to.
If you plan to list your app in the App Store, you need to fill out the App Store listing and Start guide sections located in the sidebar.
Please ensure that you have met the requirements for the App Store listing — one common pitfall is submitting images that are not in marketing format. Check the images section of the listing guide to make sure that your images are in the correct format before you submit for review.
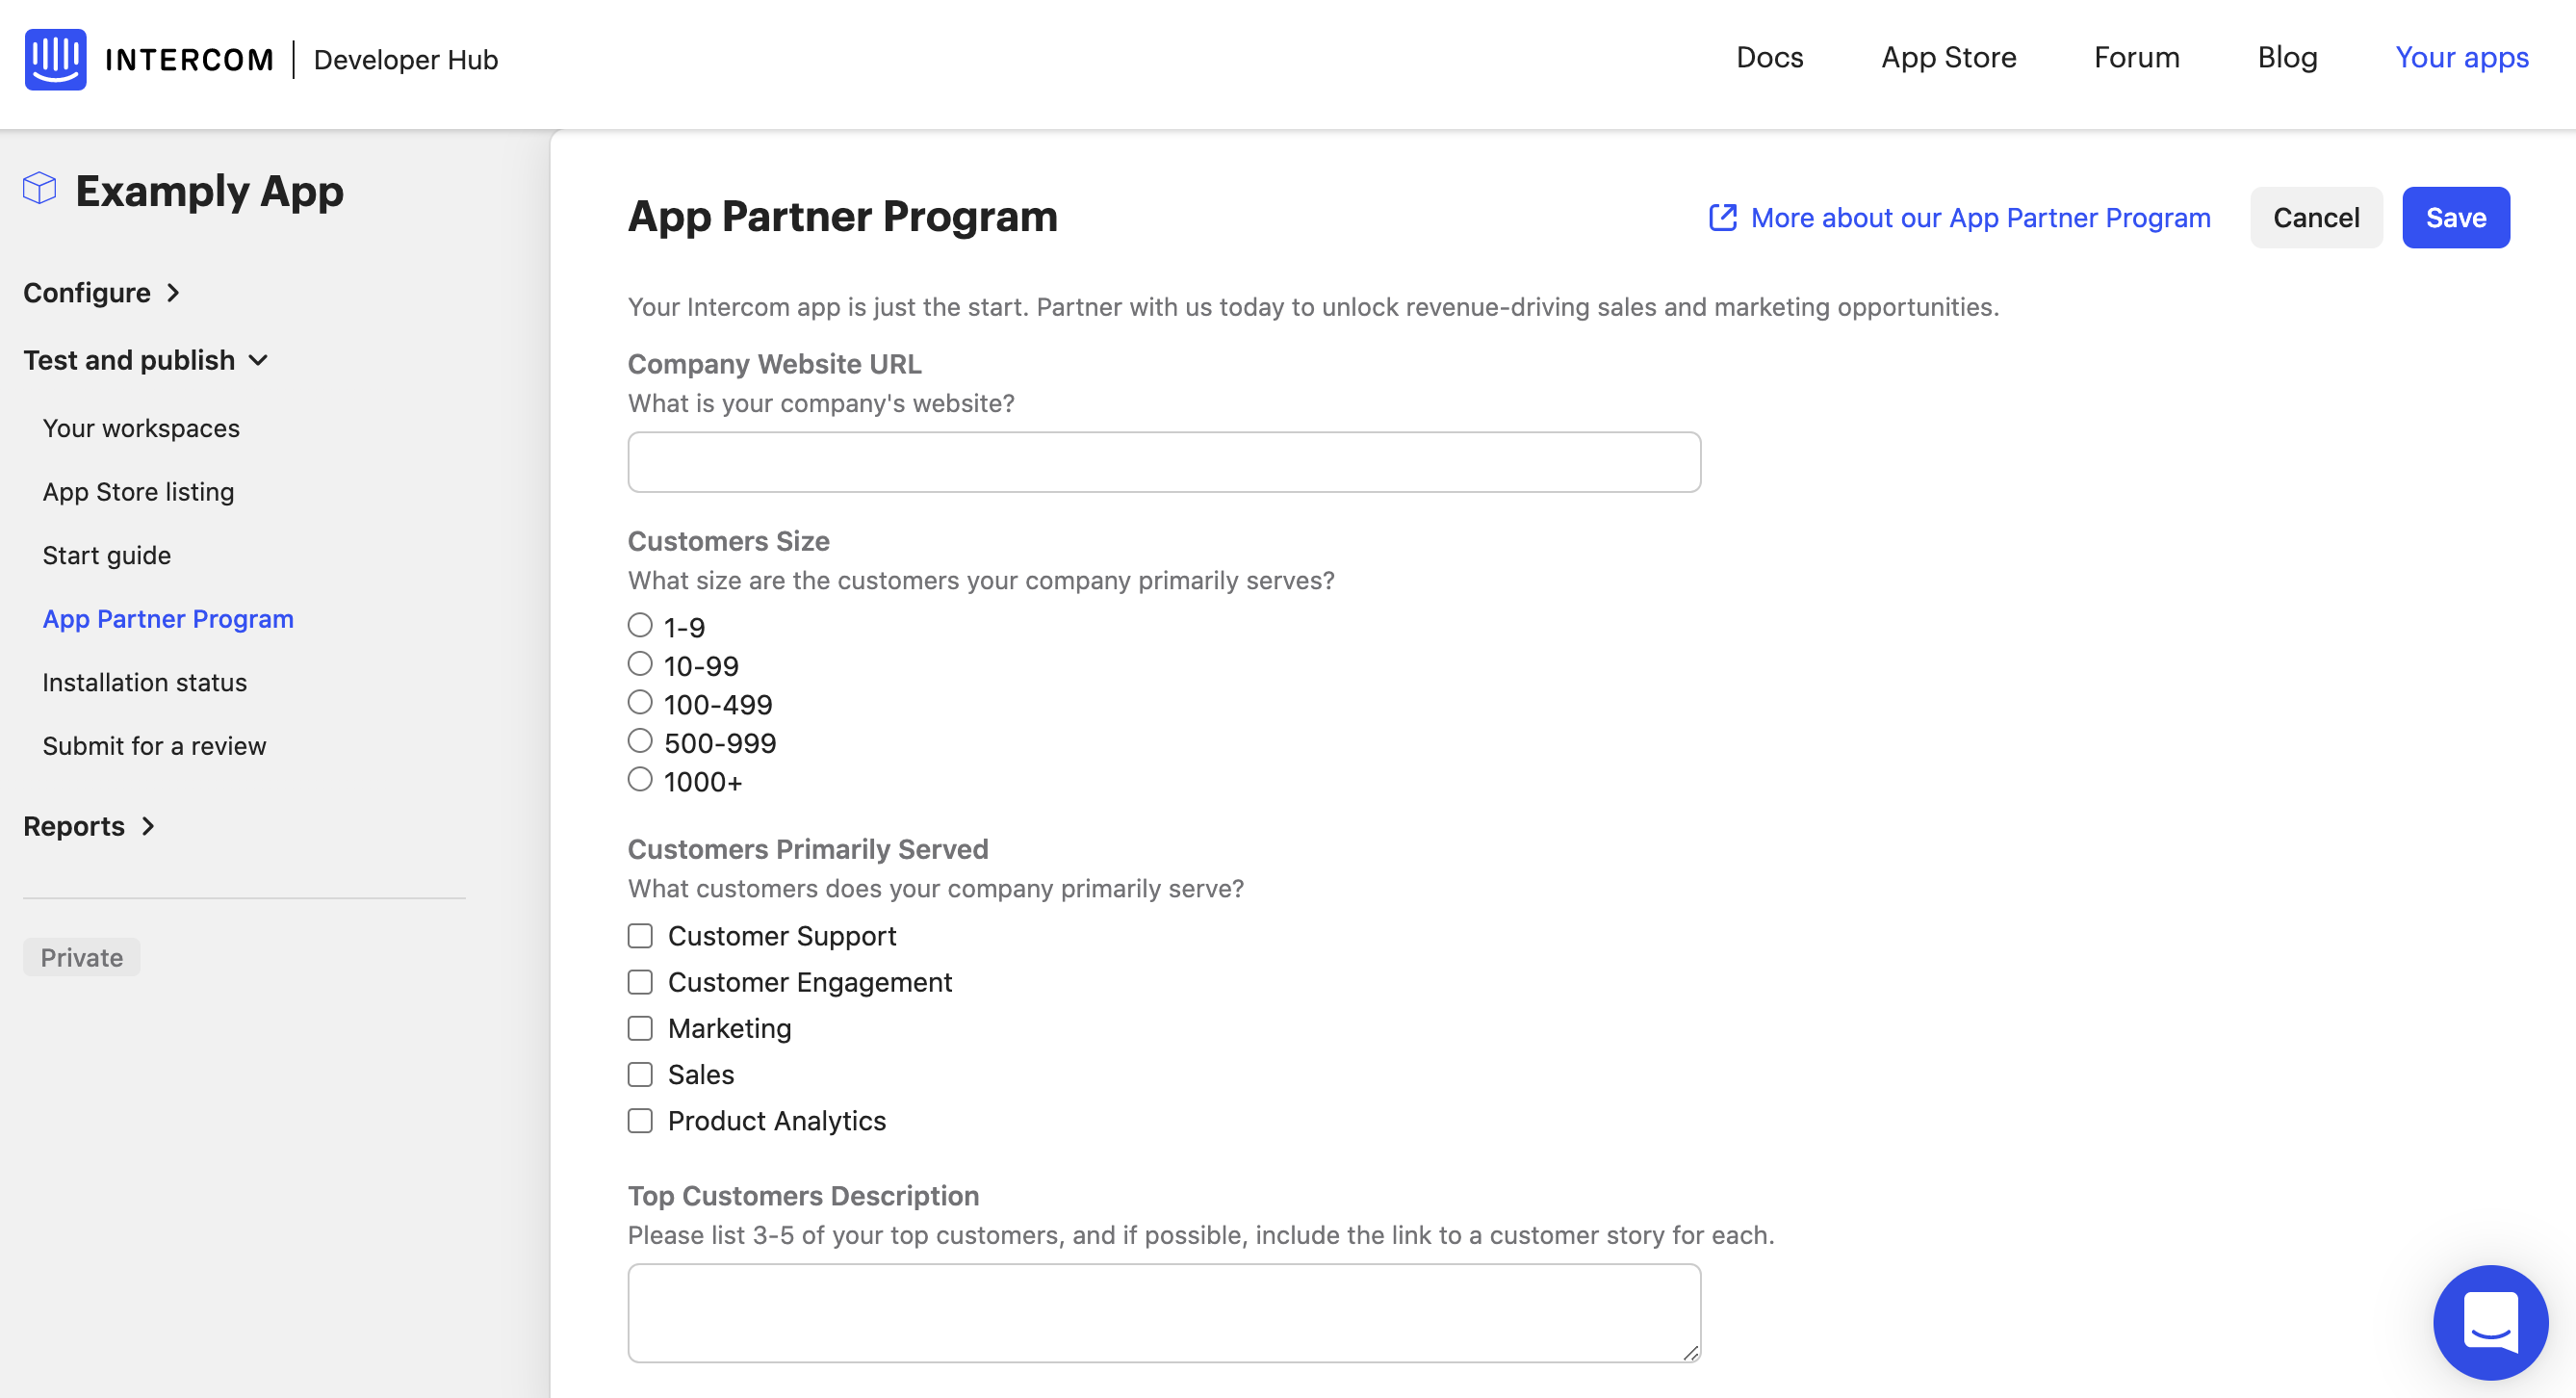
In the sidebar, you will find a section on the App Partner Program. This form asks for information including your company details, target use cases, points of contact, and more. This ensures we always have the right contact information on hand for technical, co-marketing, or co-selling opportunities.
The final step is to fill in the app description and end-to-end video sections on the "Submit for a review" page.

Once the review process starts, teammates who created the app and teammates who submitted the review will receive notifications via email and in-app in the Messenger. These notifications include when feedback and approval is given by the Intercom team for any of the actions taken.
Write a brief description of your app and how it works with Intercom.
In order to access your app we will need to test out the full functionality. This means if your app requires a subscription or account with your service, you'll need to provide us with test account credentials or set up instructions within the description.
You are required to submit a video to the team that shows:
- Installation of the app with OAuth successfully working
- The end-to-end experience and functionality of your app
- Uninstallation of the app with OAuth
Before you make your video, please check that you are following the guidelines outlined here:
- Canvas Kit: Messenger Best Practices
- Canvas Kit: Inbox Best Practices
- Building Successful Apps guides.
This is in addition to our developer terms and platform guidelines
Please show the full client_id and state parameter in the OAuth URL.
The purpose of the video is to understand if the OAuth flow works and if your app meets our app guidelines. It is also to determine whether the scopes match the required functionality of the app: If you have requested scopes outside of the current functionality, you may be asked to adjust your scopes and resubmit the app.
It is better to show too much of your app than not enough. If you do not show all of the functionality of your app as well as the OAuth processes, you will have to resubmit your video.
Click "Submit for Review" to submit your app to our team.
If you need to discard any changes that have been made to your app to start over, you can use the Discard Changes button on this page.

Once your app is with the Intercom team, we will review it to ensure it meets our requirements.
You will see a yellow banner at the top of the screen stating it can take up to seven business days for review.
Our team will reach back out to you in an in-app conversation in the Messenger (find it at the bottom right of any Intercom pages you visit) to let you know about any changes that need to be made to your app. Feel free to ask any questions in that conversation.
If you are asked to make changes, you may resubmit your app after making the requested changes and our team will review it further.

During this process, your app will be private and can only be used by you and your team.
When your app is approved, it will become a public unlisted app.
You'll see the following green banner and blue pill:
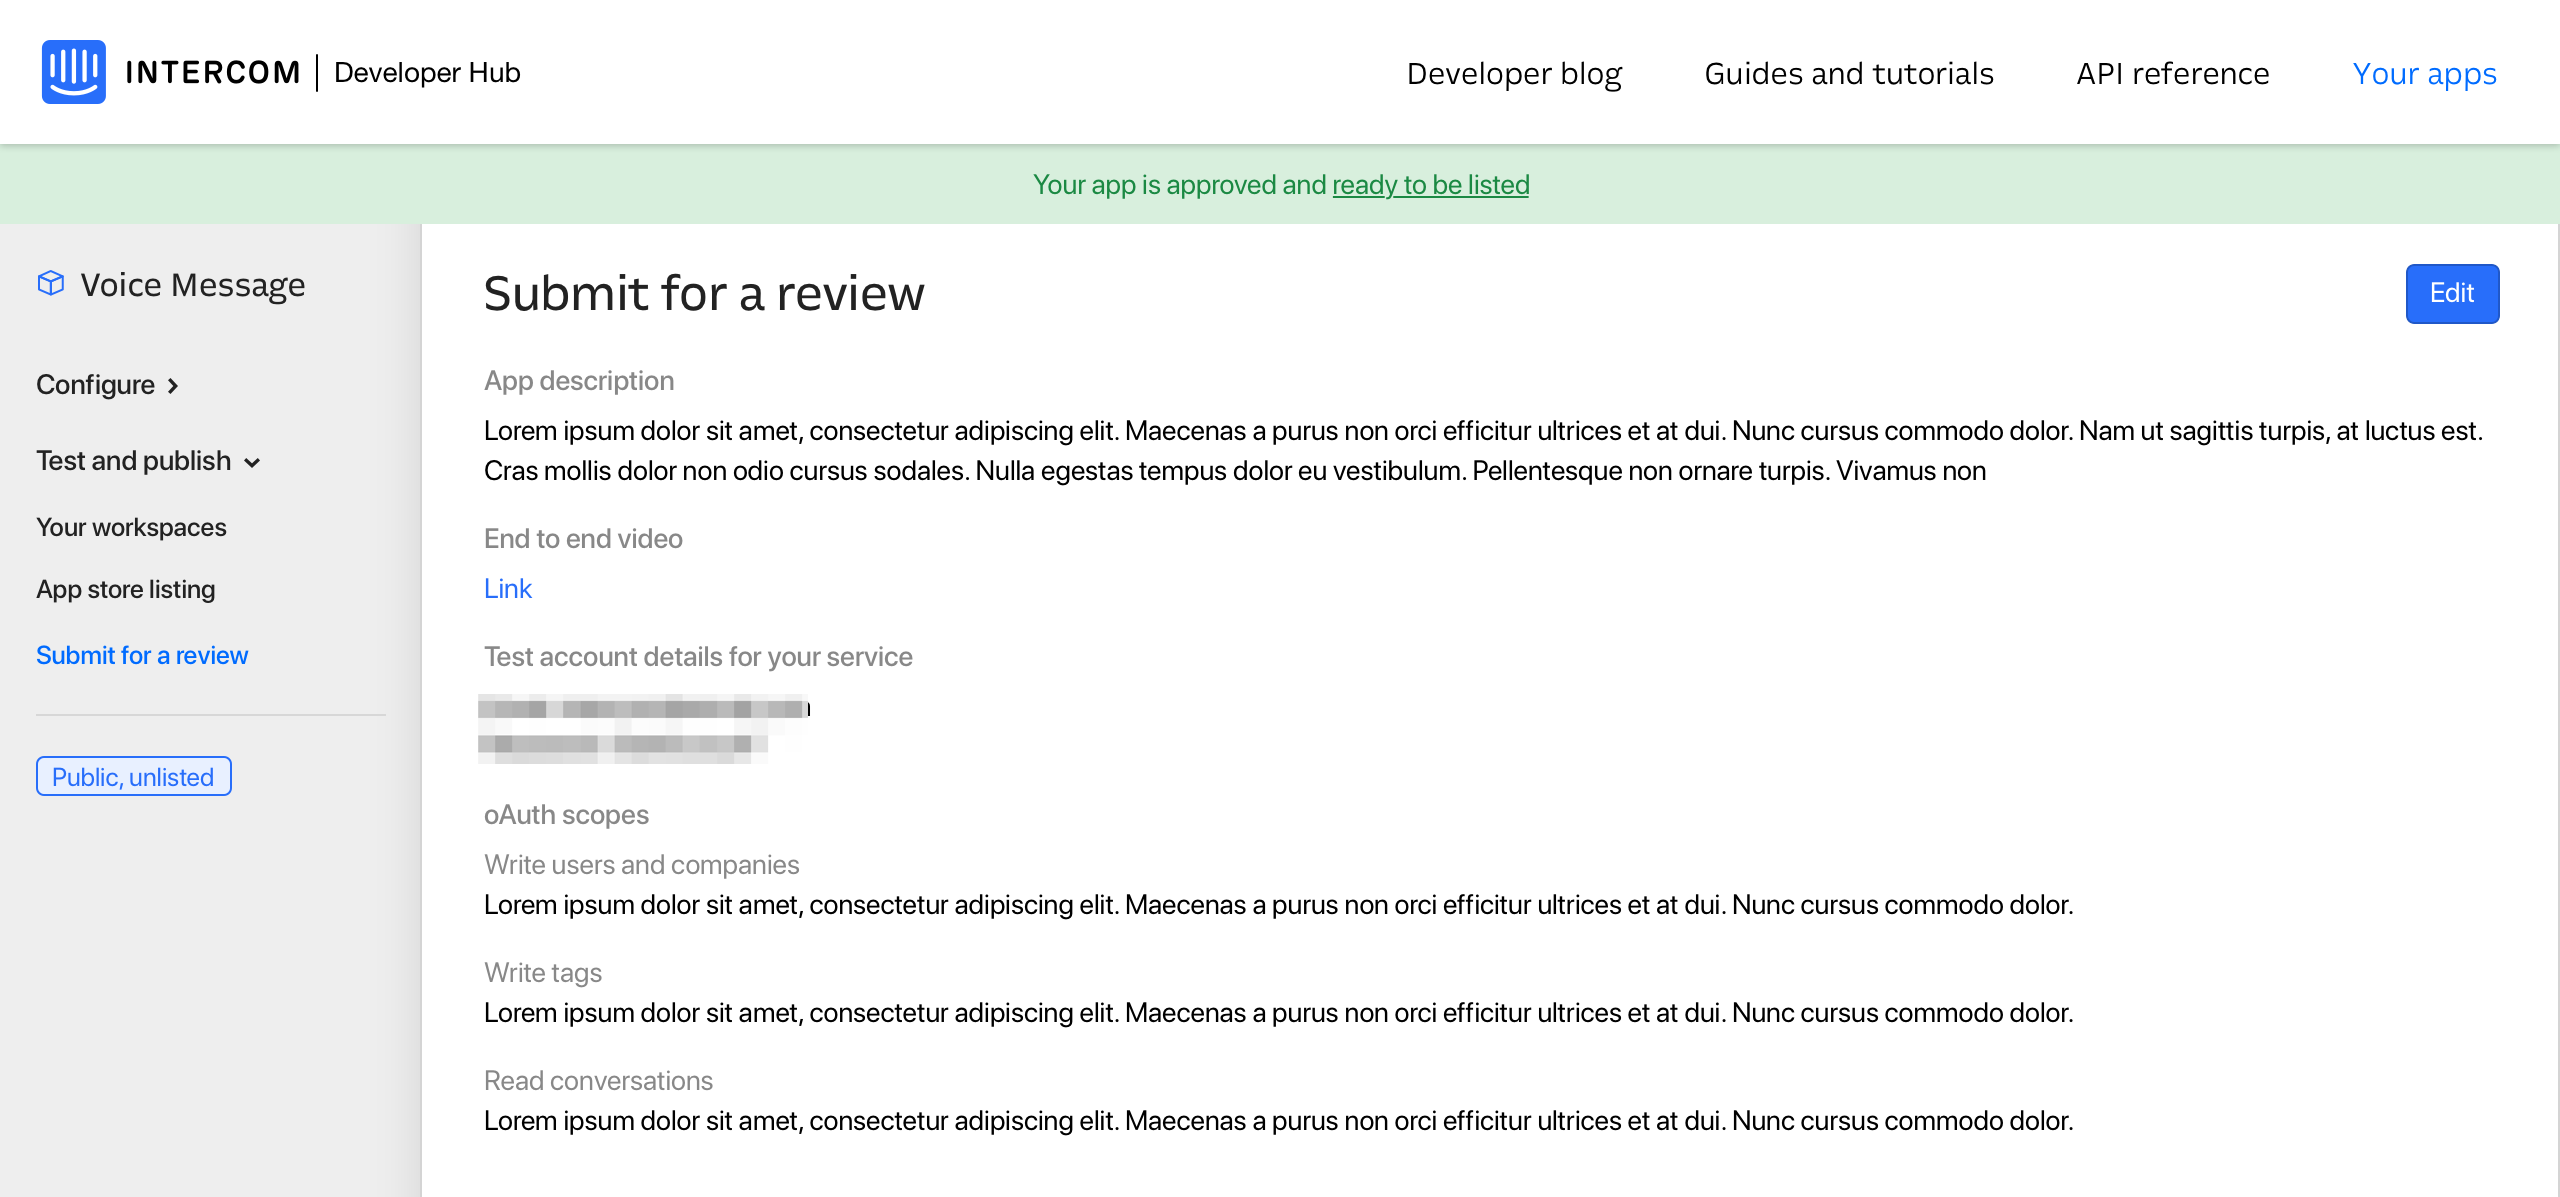
We allow your app to be public but unlisted so that you don't necessarily have to set the listing live straight away. You can instead test out your app in a separate staging environment, or send to your customers individually to collect feedback (ie. when in beta).
When you want to set your listing live for public installs via the App Store, you will need to select the List in App store option on the App Store listing page.

You may need to make changes to the current details about your app in the review, listing, or OAuth pages. There are two different systems depending on whether this is due to a rejected application or an approved application.
If your app is rejected, you will need to resubmit your app after you have made the changes that our team has requested.
We'll show you exactly where the issue is on the given page, under the header Feedback from Intercom. You can also ask use any questions you may have about the changes in the in-app conversation in the Messenger with our team.
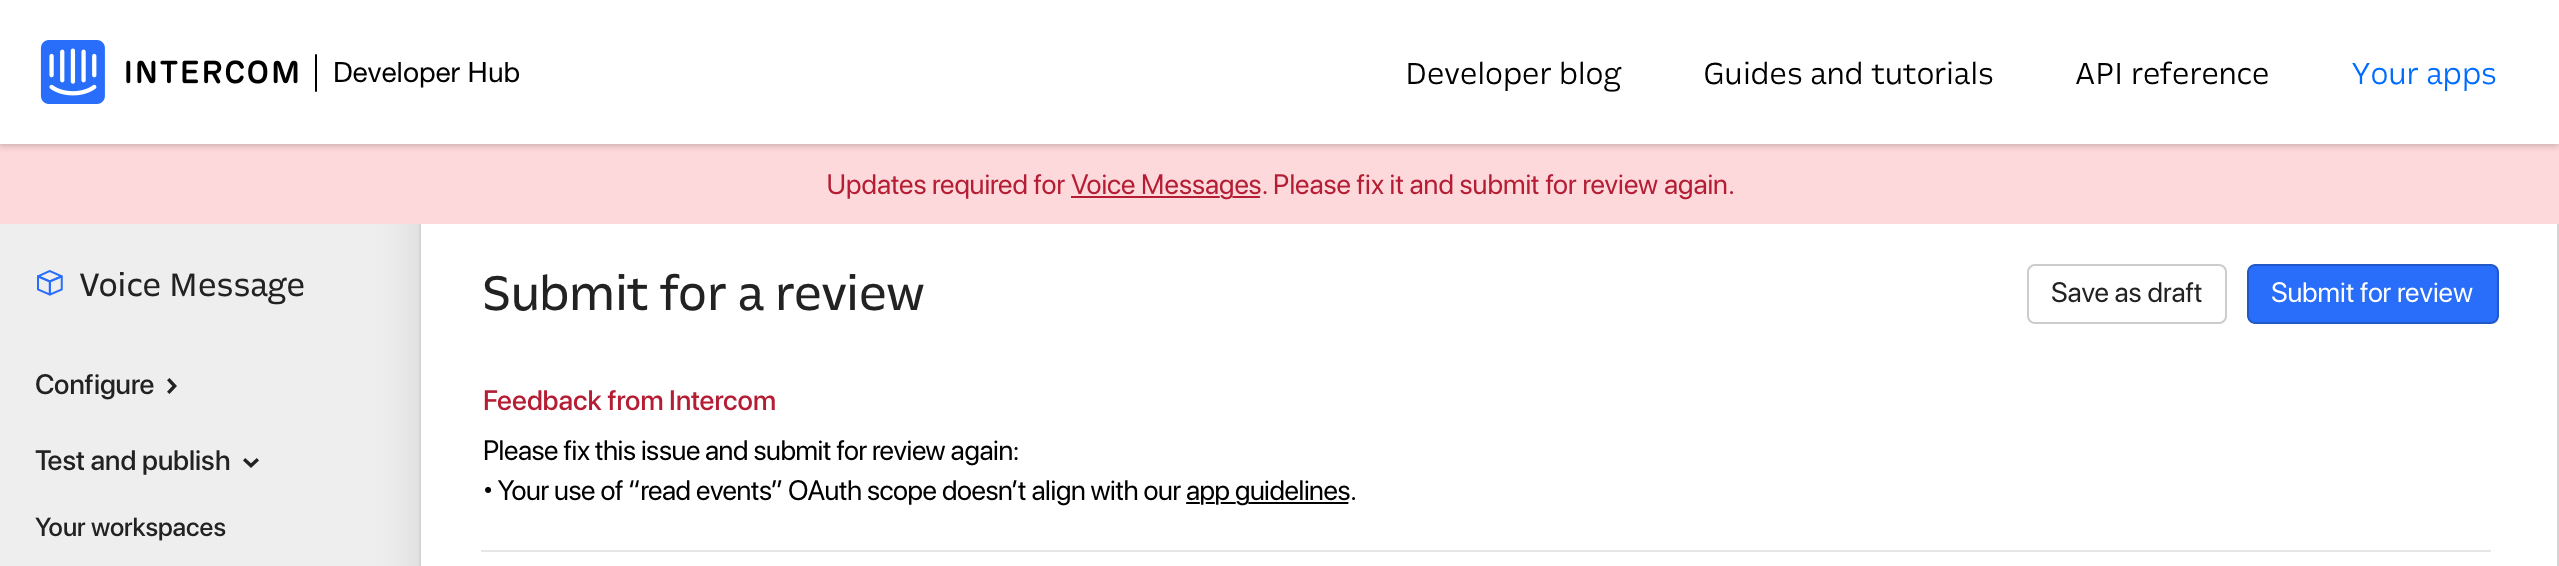
Your application can take up to seven business days to review, so ensure everything is fixed. You can then resubmit via the Submit for Review button.
Once your app is approved you are ready to publish. However, if you need to make any changes in the future the app will need to be re-approved by the Intercom team.
In the approval flow before your app was published, your app remained in a private state until the team approved it. However, in cases where an app is updated after it is approved and published, the app will remain public with the current functionality until your updates have been approved.
You can see and review all the changes in the Review changes tab in your Developer Hub before you submit again.
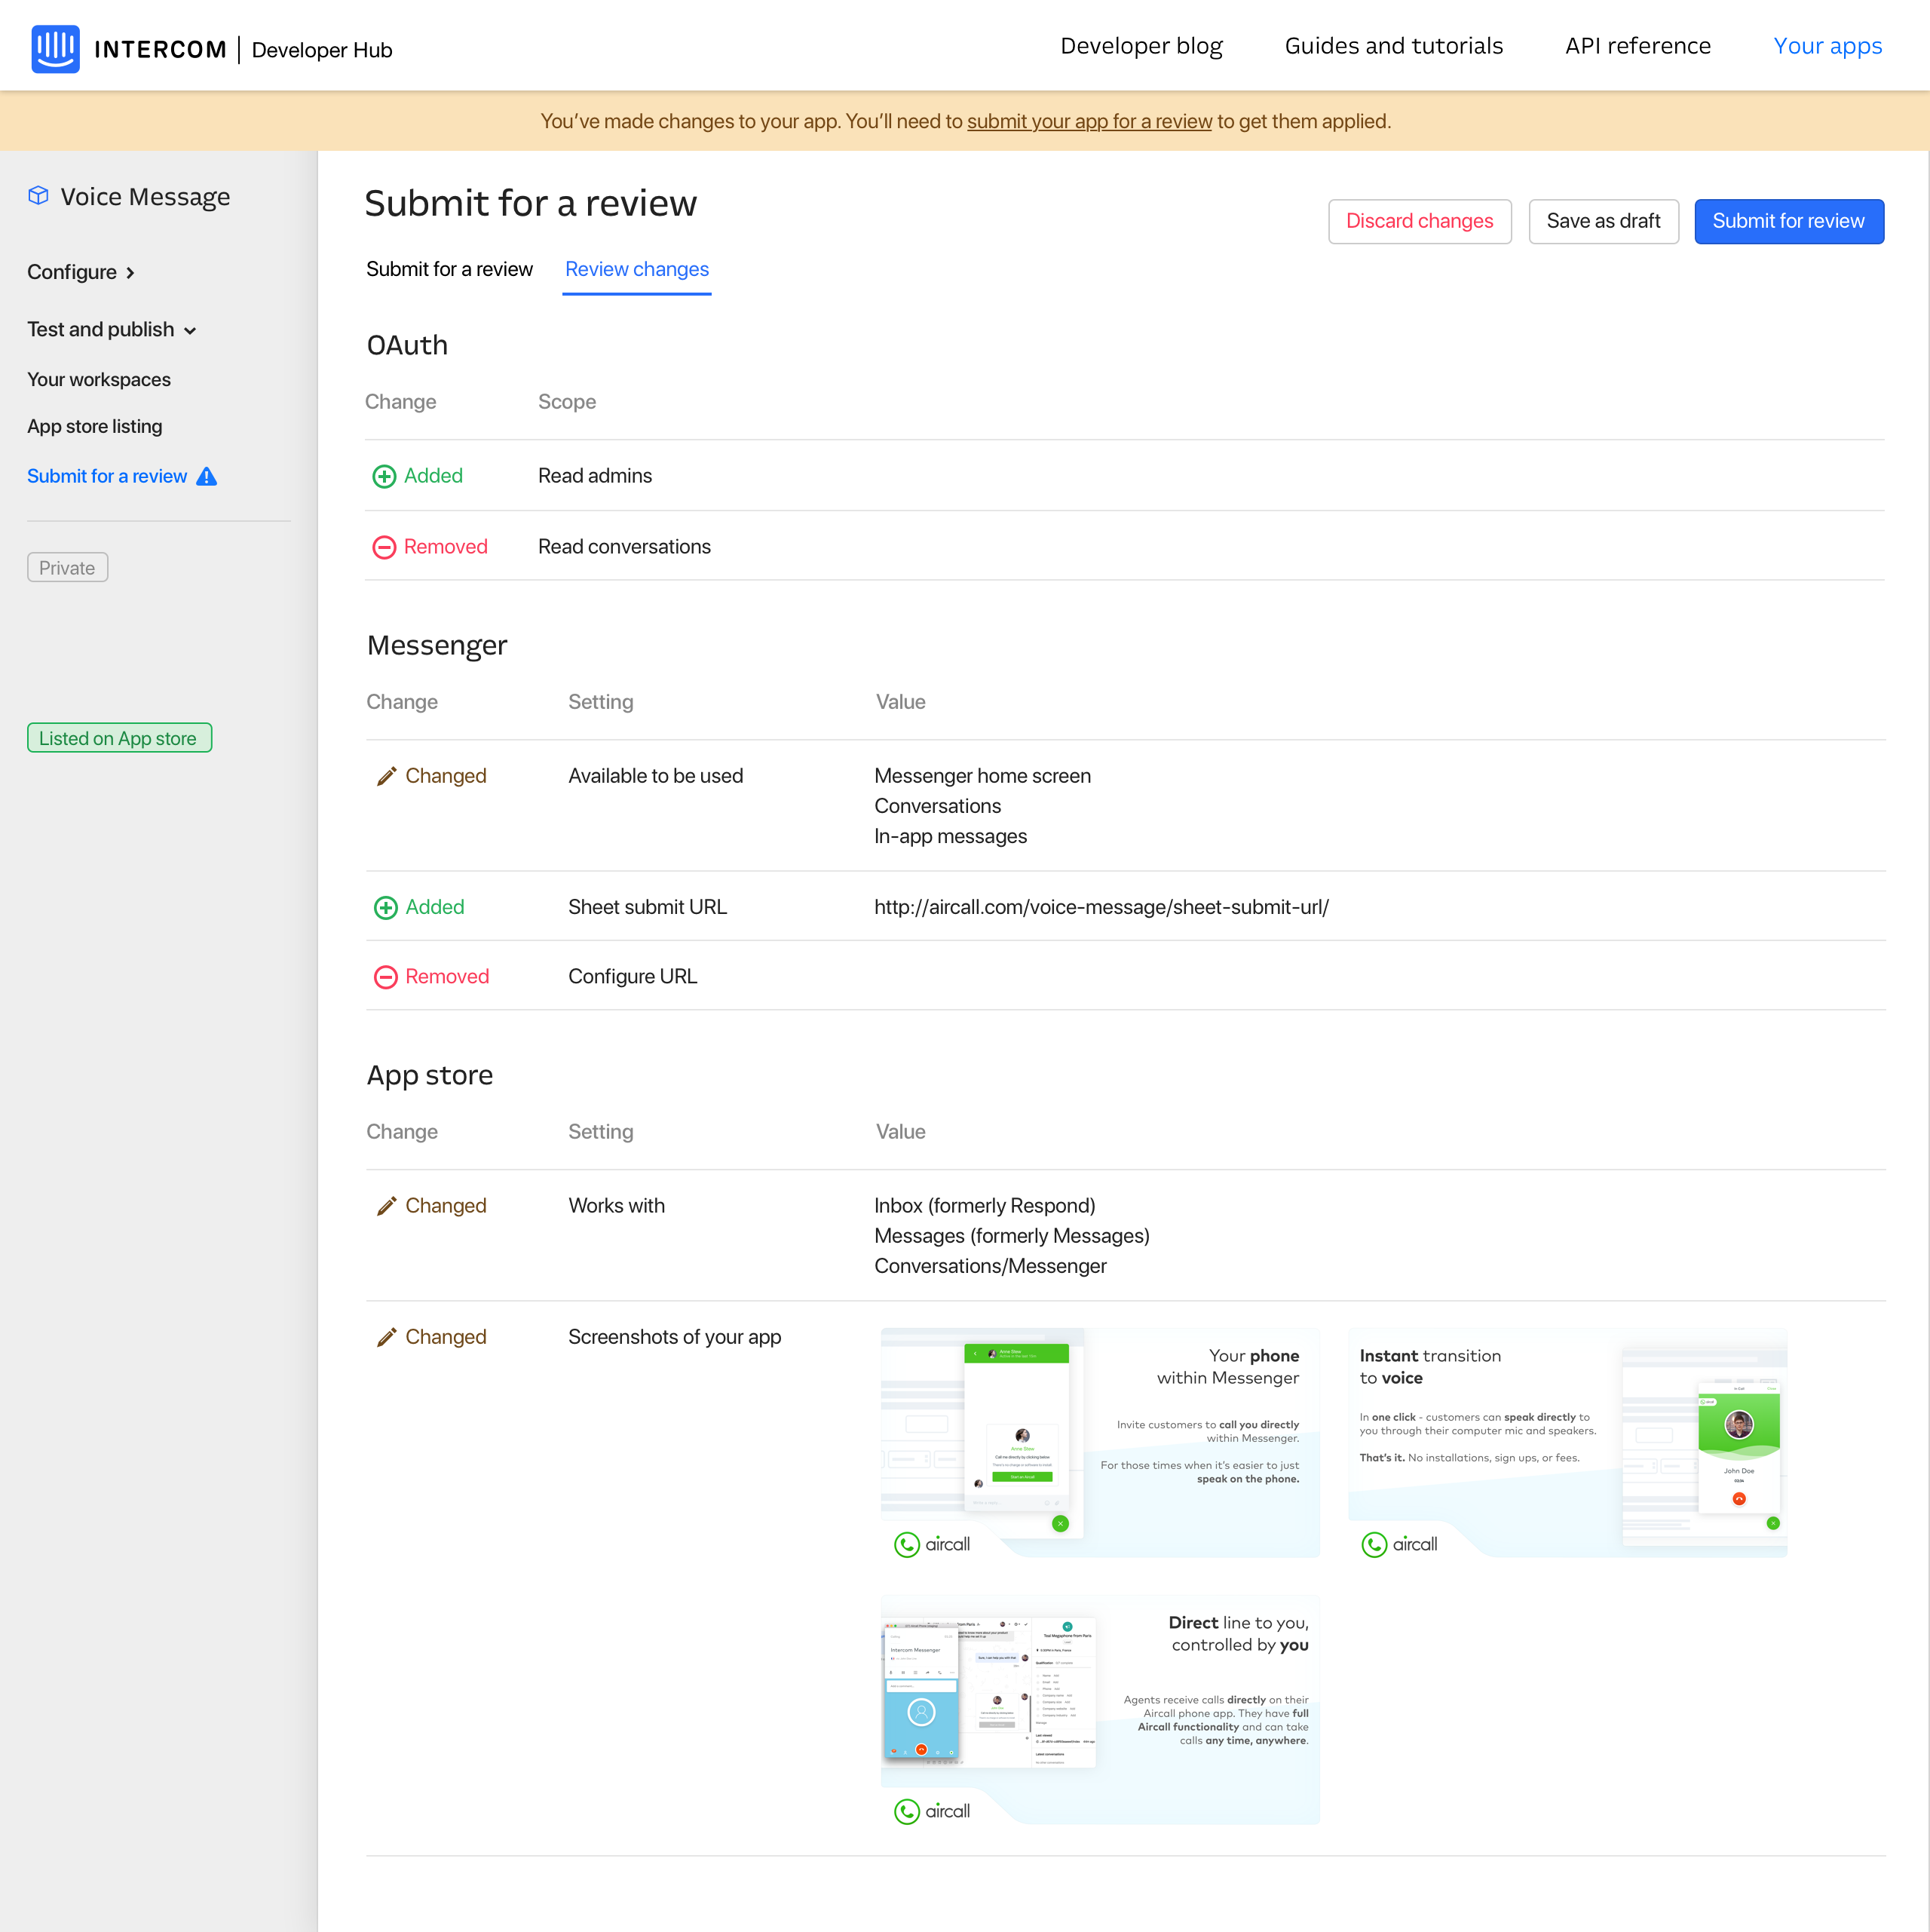
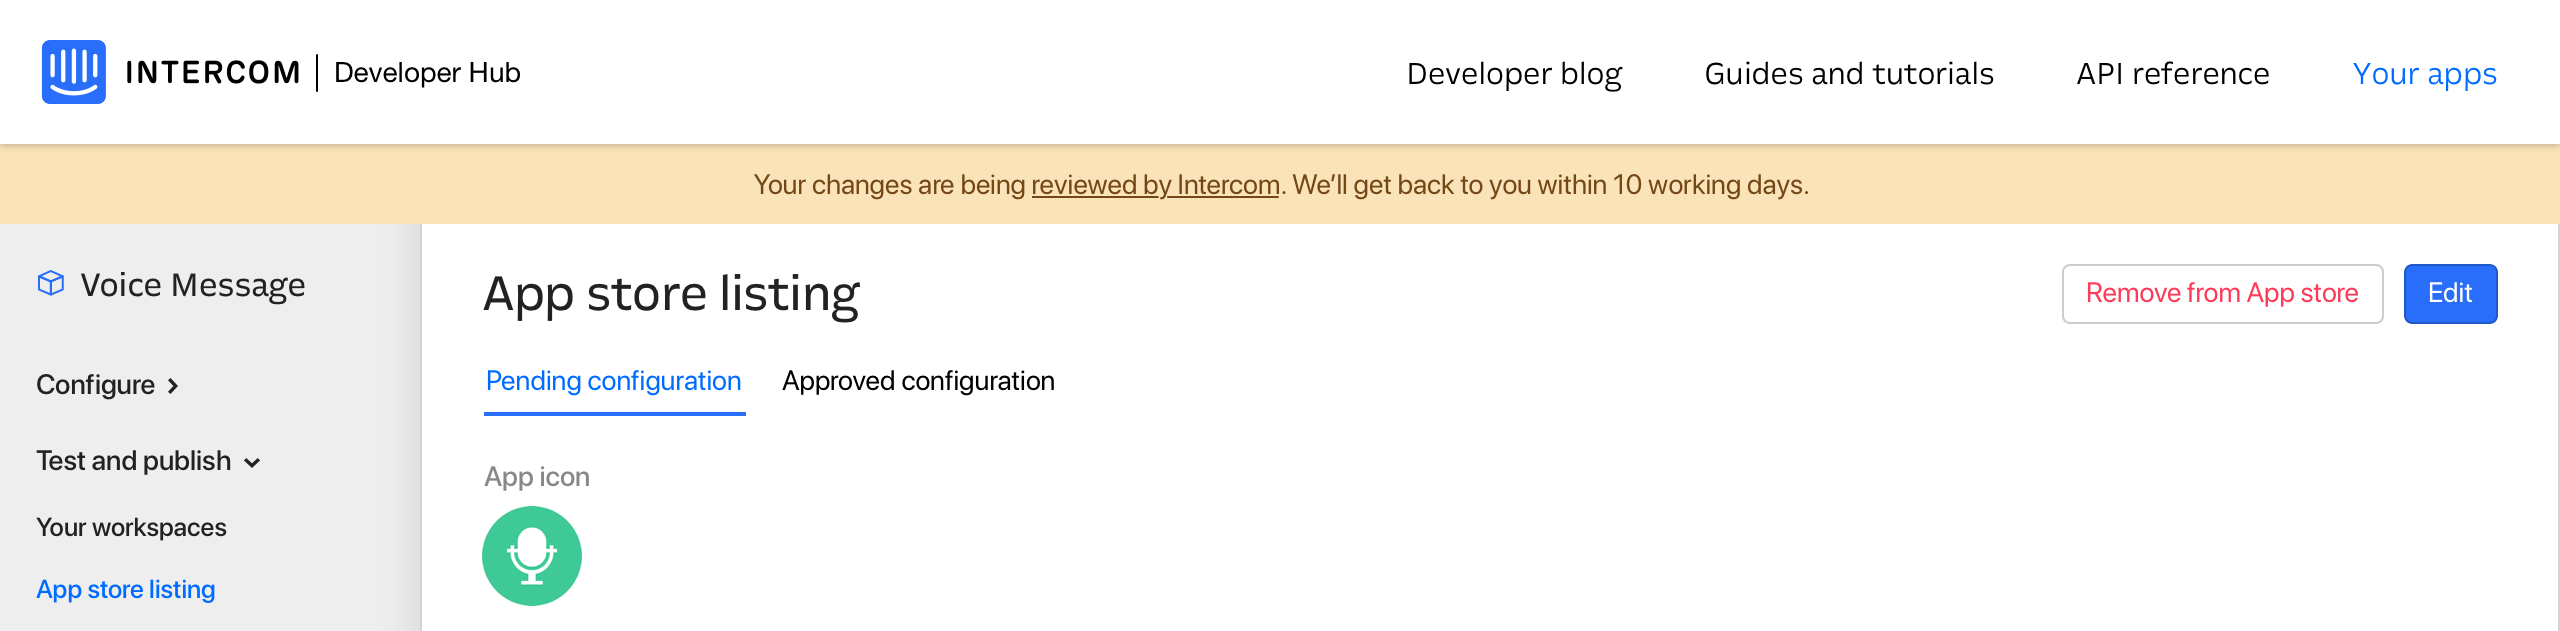
You can also see the changes to the listing being reviewed in your Pending configuration tab, and what's currently visible on the App store in the Approved configuration tab. These can be found on your App store listing page.
Once your app has been approved, you may want to continue iterating and developing without touching your production app.
We recommend creating a new app on the Developer Hub home page if you haven't already, which can be used purely as a staging app for development purposes. You can populate this with all the URLs and settings for development.
A good rule is to name the development app the same as your production app but append something such as [Staging] or [Dev] at the end to differentiate these. You'll also see that the production app will be labeled as Public and your development app will be labeled as Private.