Installation

Install Intercom to see and talk to users of your iOS app. The Intercom for iOS library supports iOS 13+ and requires Xcode 14 to build.

Step 1 - Install Intercom

If you’re new to Intercom, you’ll need to create an account and start your free trial. Then you have three options:

Option 1: CocoaPods

Cocoapods 1.10 is required to install Intercom.
Add Intercom to your Podfile and run pod install

target :YourTargetName do
  pod 'Intercom'
end

Option 2: Swift Package Manager

Add https://github.com/intercom/intercom-ios as a Swift Package Repository in Xcode and follow the instructions to add Intercom as a Swift Package.

734

Option 3: Install Intercom manually

  1. Download Intercom for iOS and extract the zip.
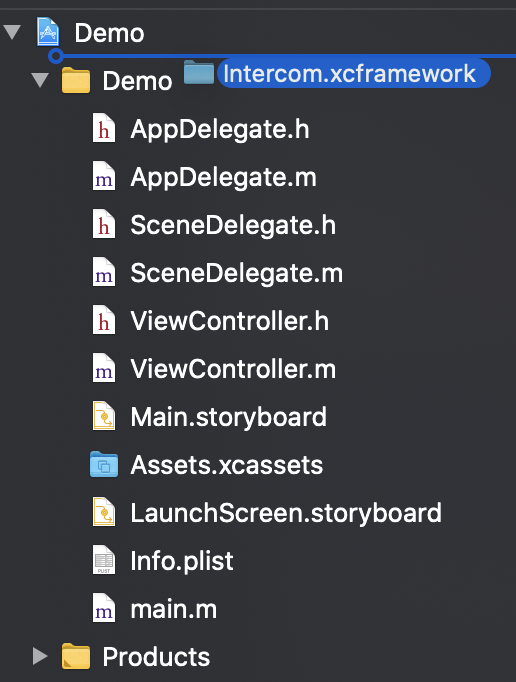
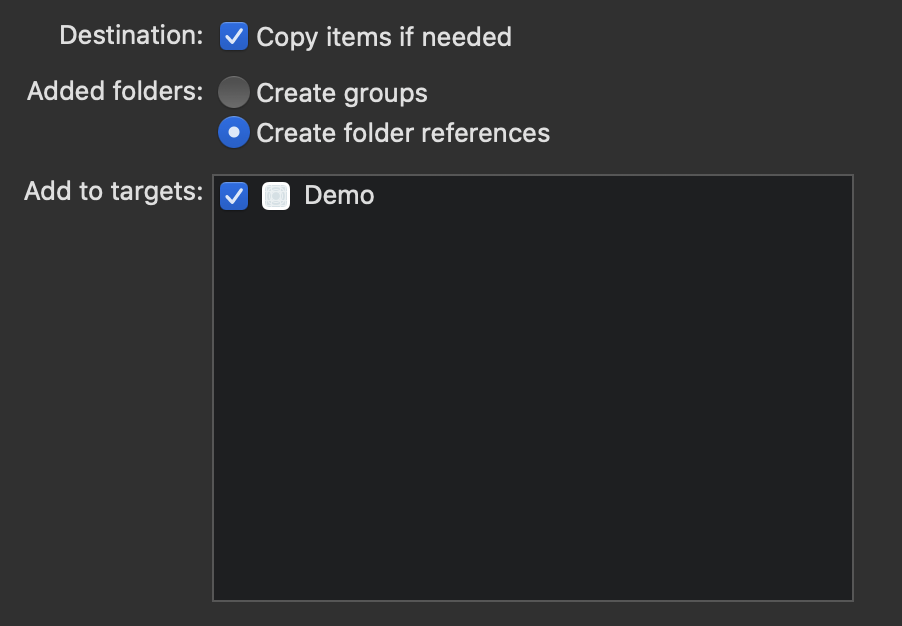
  2. Drag Intercom.xcframework into your project. Make sure "Copy items if needed" is selected and click Finish.
516 902
  1. In the target settings for your app, set the Intercom.xcframework to “Embed & Sign”. This can be found in the “Frameworks, Libraries, and Embedded Content” section of the “General” tab.
1226

Step 2 - Update Info.plist

Photo Library usage:
With the exception of apps that only support iOS 14+, when installing Intercom, you'll need to make sure that you have a NSPhotoLibraryUsageDescription entry in your Info.plist.

For apps that support iOS 13, this is required by Apple to access the photo library. It is necessary when installing Intercom due to the image upload functionality. Users will be prompted for the photo library permission only when they tap the image upload button.

On iOS 14+, Intercom uses the new PHPickerViewController API which does not require requesting users for photo library permission.

Step 3 - Initialize Intercom

First, you'll need to get your Intercom app ID and iOS API key. To find these, just select the 'Intercom for iOS' option in your app settings.

2880

Then initialize Intercom by importing Intercom and adding the following to your application delegate:

@import Intercom;

- (BOOL)application:(UIApplication *)application didFinishLaunchingWithOptions:(NSDictionary *)launchOptions {
    [Intercom setApiKey:@"<Your iOS API Key>" forAppId:@"<Your App ID>"];
}
import Intercom 
  
func application(_ application: UIApplication, didFinishLaunchingWithOptions launchOptions: [UIApplication.LaunchOptionsKey: Any]?) -> Bool {
     Intercom.setApiKey("<Your iOS API Key>", forAppId: "<Your App ID>")
}

If your app is using a UISceneDelegate you will need to put your Intercom initialisation code into your SceneDelegate

@import Intercom;

- (void)scene:(UIScene *)scene willConnectToSession:(UISceneSession *)session options:(UISceneConnectionOptions *)connectionOptions {
    [Intercom setApiKey:@"<Your iOS API Key>" forAppId:@"<Your App ID>"];
}
import Intercom 

func scene(_ scene: UIScene, willConnectTo session: UISceneSession, options connectionOptions: UIScene.ConnectionOptions) {
    Intercom.setApiKey("<Your iOS API Key>", forAppId: "<Your App ID>")
}

Step 4 - Log your users into Intercom

You’ll need to log your users into Intercom before you can talk to them or see what the do in your app. There are two type of users that can be created in Intercom: identified and unidentified.

  • Identified users: If users need to login to your app to use it, such as Facebook, Instagram, or Slack, they would be considered identified users.
  • Unidentified users: If your app does not have a login option, like Angry Birds or a flashlight app, you have unidentified users.

There are three ways to log users into Intercom that visit your app:

  1. Only login unidentified users
  2. Only login identified users
  3. Login both identified and unidentified users - an example of this is where your app has a login option, but it’s not essential for users to login to use your app, like Google Maps or YouTube.

The option you choose should be informed by the design of your app, namely whether you have a login option.

Login only unidentified users

If you have an app with no login option (like Angry Birds or a flashlight app), you should only login unidentified users.

Just login as an unidentified user in your application’s delegate, like so:

- (BOOL)application:(UIApplication *)application didFinishLaunchingWithOptions:(NSDictionary *)launchOptions {
    [Intercom loginUnidentifiedUserWithSuccess:^{
        // Handle success
    } failure:^(NSError * _Nonnull error) {
        // Handle error
    }];
}
func application(_ application: UIApplication, didFinishLaunchingWithOptions launchOptions: [UIApplication.LaunchOptionsKey: Any]?) -> Bool {
    Intercom.loginUnidentifiedUser { result in
        switch result {
        case .success:
            // Handle success
        case .failure(let error):
            // Handle error
        }
    }
}

If the failure block of this call is executed, you can check against our list of error codes to help debug the issue.

📘

If a request to login a user fails, it will be retried before calling the failure callback. Furthermore if all login retries have failed, you can still attempt to call other Intercom methods, as the Intercom SDK will first try to log the user in if previous login attempts have failed. The success and failure callbacks are also optional, so nil can be passed to them in scenarios where you’re not interested in their outcome.

Login only identified (logged in) users

If people must log in to access your app (as in with Facebook, Instagram or Slack) you should follow these instructions to login identified users to Intercom only.

Best practices for logging in users

  • It is important to only login identified users to Intercom after verification of a login
  • We recommend giving all your users unique userIds, but if you haven’t implemented this, you should create an ICMUserAttributes object and only populate the email property instead of populating the userId . Do not use an email address as a userId as this field cannot be changed later. If you choose to login a user with just an email, the email address must not be associated with any other users on your workspace.
  1. First, you’ll need to log your user into Intercom when your app launches, like this:
- (BOOL)application:(UIApplication *)application didFinishLaunchingWithOptions:(NSDictionary *)launchOptions {
    ICMUserAttributes *userAttributes = [ICMUserAttributes new];
    userAttributes.userId = @"<#123456#>";
    [Intercom loginUserWithUserAttributes:userAttributes success:^{
        // Handle success
    } failure:^(NSError * _Nonnull error) {
        // Handle failure
    }];
}
func application(_ application: UIApplication, didFinishLaunchingWithOptions launchOptions: [UIApplication.LaunchOptionsKey: Any]?) -> Bool {
    let attributes = ICMUserAttributes()
    attributes.email = "<#123456#>"
    Intercom.loginUser(with: attributes) { result in
        switch result {
        case .success:
            // Handle success
        case .failure(let error):
            // Handle error
        }
    }
}

If the failure block of this call is executed, you can check against our list of error codes to help debug the issue.

📘

If you don’t have a unique userId to use here, you can create an ICMUserAttributes object and just populate the email property. Similarly, if you have both a userId and an email, you can populate both the userId and email attributes of the ICMUserAttributes object.

  1. You’ll also need to log your users into Intercom anywhere they login to your app:
- (void)successfulLogin {
    ICMUserAttributes *userAttributes = [ICMUserAttributes new];
    userAttributes.userId = @"<#123456#>";
    [Intercom loginUserWithUserAttributes:userAttributes success:^{
        // Handle success
    } failure:^(NSError * _Nonnull error) {
        // Handle failure
    }];
}
func successfulLogin() {
    let attributes = ICMUserAttributes()
    attributes.email = "<#123456#>"
    Intercom.loginUser(with: attributes) { result in
        switch result {
        case .success:
            // Handle success
        case .failure(let error):
            // Handle error
        }
    }
}

If the failure block of this call is executed, you can check against our list of error codes to help debug the issue.

Login both unidentified (non-logged in) and identified (logged in) users

If you have an app with both unidentified and identified users (like Google Maps or YouTube), follow these instructions.

Best practices for logging in users

  • It is important to only login identified users to Intercom after verification of login to your app
  • We recommend giving all your users unique userIds, but if you haven’t implemented this, you should create an ICMUserAttributes object and only populate the email property instead of populating the userId . Do not use an email address as a userId as this field cannot be changed later. If you choose to login a user with just an email, the email address must not be associated with any other users on your workspace.
  1. First, you’ll need to log your users into Intercom when your app launches, like this:
- (BOOL)application:(UIApplication *)application didFinishLaunchingWithOptions:(NSDictionary *)launchOptions {
    if (loggedIn) {
        ICMUserAttributes *userAttributes = [ICMUserAttributes new];
        userAttributes.userId = @"<#123456#>";
        [Intercom loginUserWithUserAttributes:userAttributes success:^{
            // Handle success
        } failure:^(NSError * _Nonnull error) {
            // Handle failure
        }];
    } else {
        [Intercom loginUnidentifiedUserWithSuccess:^{
            // Handle success
        } failure:^(NSError * _Nonnull error) {
            // Handle error
        }];
    }
}
func application(_ application: UIApplication, didFinishLaunchingWithOptions launchOptions: [UIApplication.LaunchOptionsKey: Any]?) -> Bool {
    if loggedIn {
        let attributes = ICMUserAttributes()
        attributes.email = "<#123456#>"
        Intercom.loginUser(with: attributes) { result in
            switch result {
            case .success:
                // Handle success
            case .failure(let error):
                // Handle error
            }
        }
    } else {
        Intercom.loginUnidentifiedUser { result in
            switch result {
            case .success:
                // Handle success
            case .failure(let error):
                // Handle error
            }
        }
    }
}

📘

If you don’t have a unique userId to use here, you can create an ICMUserAttributes object and just populate the email property. Similarly, if you have both a userId and an email, you can populate both the userId and email attributes of the ICMUserAttributes object.

  1. You’ll also need to log your users into Intercom anywhere they login to your app:
- (void)successfulLogin {
    ICMUserAttributes *userAttributes = [ICMUserAttributes new];
    userAttributes.userId = @"<#123456#>";
    [Intercom loginUserWithUserAttributes:userAttributes success:^{
        // Handle success
    } failure:^(NSError * _Nonnull error) {
        // Handle failure
    }];
}
func successfulLogin() {
    let attributes = ICMUserAttributes()
    attributes.email = "<#123456#>"
    Intercom.loginUser(with: attributes) { result in
        switch result {
        case .success:
            // Handle success
        case .failure(let error):
            // Handle error
        }
    }
}

If the failure block of this call is executed, you can check against our list of error codes to help debug the issue.

How to log out an identified user

You should only log out an identified user. Logging out an unidentified user will result in orphan records that cannot be merged in future.

When users want to log out of your app simply call:

- (void)logout {
    [Intercom logout];
}
func logout() {
    Intercom.logout()
}

👍

Intercom knows when your app is backgrounded and comes alive again, so you won’t need to log your users in again.

Demo

What next?

  1. Once you've got Intercom installed it's time to configure it for your iOS app.
  2. Enable push notifications so you can send push messages.
  3. Enable Identity Verification for your iOS app.