Install Intercom to see and talk to users of your iOS app. The Intercom for iOS library supports iOS 15+ and requires Xcode 15 to build.
If you’re new to Intercom, you’ll need to create an account and start your free trial.
Go to your settings and under Installation select install for mobile.

Then choose iOS.

Next, enable user traffic for Messenger.
You must ensure that the iOS Messenger is enabled from inside the Intercom settings panel. When this is disabled, all requests to Intercom will fail.

Then you have three options:
Using the latest version of Cocoapods, add Intercom to your Podfile and run pod install --repo-update
target :YourTargetName do
  pod 'Intercom'
endAdd https://github.com/intercom/intercom-ios-sp as a Swift Package Repository in Xcode and follow the instructions to add Intercom as a Swift Package.

- Download Intercom for iOS and extract the zip.
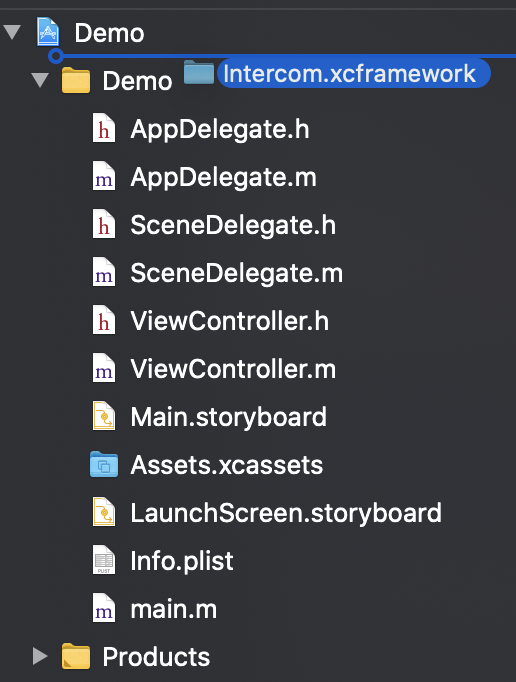
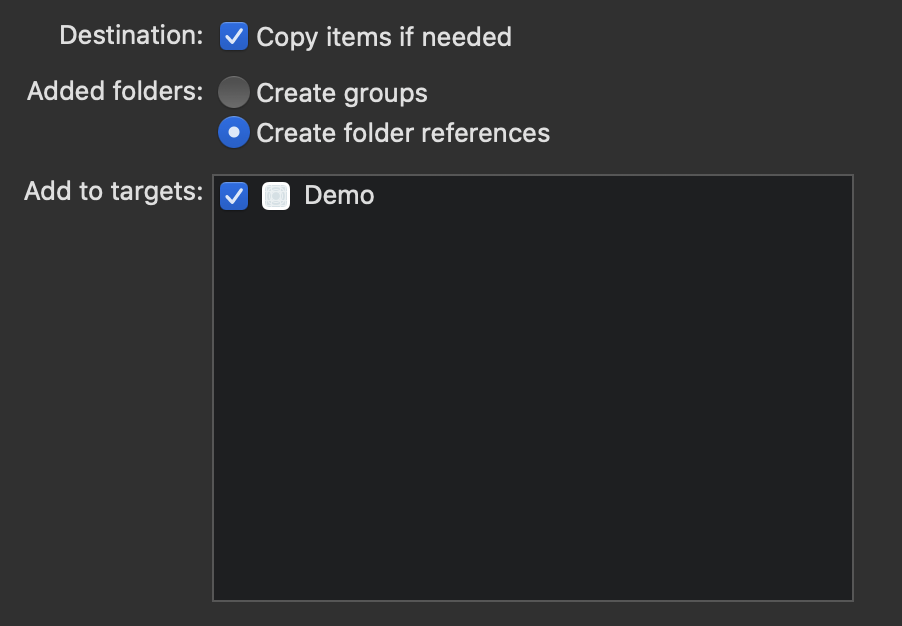
- Drag
Intercom.xcframeworkinto your project. Make sure ** "Copy items if needed"** is selected and click Finish.


- In the target settings for your app, set the
Intercom.xcframeworkto “Embed & Sign”. This can be found in the “Frameworks, Libraries, and Embedded Content” section of the “General” tab.

Camera usage:
You need to make sure that you have a NSCameraUsageDescription entry in your Info.plist. This is required by Apple to access device's camera. It is necessary when installing Intercom due to the camera upload functionality. Users will be prompted for the camera and permission only when they tap the camera upload button. You can also optionally add an entry for NSMicrophoneUsageDescription. This is required if you wish to use record a video and upload it to a conversation.
Initialize Intercom by importing Intercom and adding the following to your application delegate:
import Intercom

func application(_ application: UIApplication, didFinishLaunchingWithOptions launchOptions: [UIApplication.LaunchOptionsKey: Any]?) -> Bool {
     Intercom.setApiKey("<Your iOS API Key>", forAppId: "<Your App ID>")
}
If your app is using a UISceneDelegate you will need to put your Intercom initialisation code into your SceneDelegate
import Intercom

func scene(_ scene: UIScene, willConnectTo session: UISceneSession, options connectionOptions: UIScene.ConnectionOptions) {
 	Intercom.setApiKey("<Your iOS API Key>", forAppId: "<Your App ID>")
}
You can also manage your API Keys during this step.

You can check to see if your installation was successful. If the Messenger has been found for your chosen installation you will receive a success notification, otherwise or you will be notified that something has gone wrong.

Once you've installed Intercom you can start using Intercom in your iOS app.
- Configure your iOS app.
- Enable push notifications so you can send push messages.
- Enable Identity Verification for your iOS app.